If you have customized WooCommerce files in your theme (or child theme), then you probably know that updating them is one of the most painful parts of maintaining a WooCommerce site. If you don’t know what I’m talking about, your Woo template files are probably not customized, OR, you’ve just been neglecting it and they are probably way out of date.
The “Official” Way
WooCommerce’s official documentation lists four seemingly simple steps to update your custom templates, summarized here:
- Go to WooCommerce > Status > System Status to see which templates need updating.
- Save a backup of the outdated template.
- Copy the default template into your theme folder
- Replicate any changes that you had to the previous template in your new, updated template file.
The fourth step is where this list is massively oversimplified. That’s where you actually replicate your template customizations to the new template.
To be fair, if you only made minor changes to your templates, replicating the changes on the new templates might not be so bad.
But, on the other hand, if you inherited a super old site that had never been updated like I did, you might have trouble distinguishing which changes were intentional theme customizations and which were from WooCommerce.
If you’re facing that dilemma, you’ll want to keep reading.
The Problem
The problem with the “official” way of doing it is that if your template files are way out of date, there are going to be changes in there due to WooCommerce’s updates over time. So, when comparing very old template files to the latest, it can be hard to tell what things you customized and what was changed by Woo over the course of various versions.
If you simply push over ALL of the changed lines, you’ll end up with your original, out-of-date file, just with an updated version number!
The Most Thorough Way
The only way I’ve found to work around that problem is to first download the official WooCommerce template files corresponding to the version that your customized template files are at. You can find them here:
Next, use a file compare program to compare your custom template files with the official original template files that you downloaded. A great program for doing this on Windows is WinMerge. Here’s what that looks like:
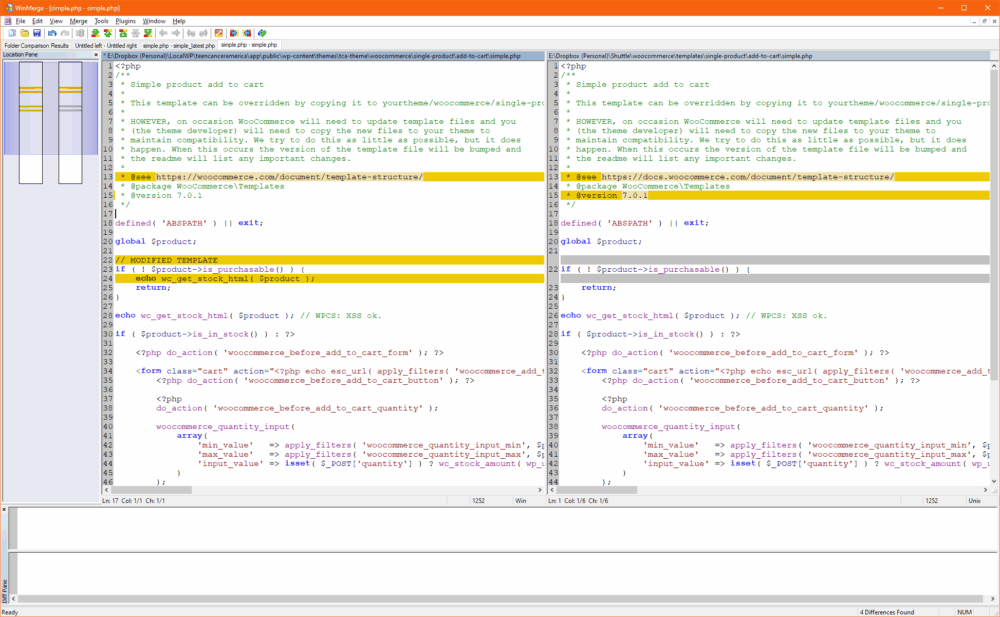
All of the lines in yellow are customizations that were made to the template file.
If you had done this exercise using the latest WooCommerce template files, you’d see more changes due to WooCommerce’s updates over time, making it harder to figure out what you changed and what they changed. If you can’t differentiate what you changed and what they changed, you won’t know which changes to carry forward to the latest template.
Once you’ve done this exercise, you can more easily carry forward the changes that you made to the template to the latest version of the template.
Of course, you also need to worry about changes that WooCommerce made over time that might break something on your site!
But at least you now know the difference between what you changed and what they changed.
The Nitty Gritty
In practice, you’ll find that you might have three editor windows open:
- The WinMerge window showing your custom template file vs. the original template of that version (that is actually kind of like two windows)
- Your new template file that you’re working on (based on the latest WooCommerce template file)
- The latest WooCommerce template file, unedited for reference (this may or may not be needed)
Needless to say, I recommend using a large screen for doing this!
Also, I didn’t mention the standard good practices of backing up your site, testing on staging, etc. Those go without saying!
Conclusions
Was this helpful to you? Have you found a better way to update very outdated WooCommerce template files? Let me know in the comments! – Brian

I am a freelance web developer and consultant based in Santa Monica, CA. I’ve been designing websites using WordPress and from scratch using HTML, CSS, PHP, and JavaScript since 2010. I create websites and web applications for businesses, nonprofits, and other organizations. I have a degree in Electrical Engineering (BSEE) from California Institute of Technology and a degree in Engineering Management (MSEM) from Stanford University. If you need help with your site, you can hire me!